I had completely forgotten about this topic. I remembered that I was interested in it in the past, but when the topic of TLS certificates for onion domains came up, it was only available from DigiCert and that was not a financially viable option for me. Ultimately, these are solutions more for business. Fortunately, Harica came along, which I wrote about here (check it for more details).
In general, you know you’re getting old when you go looking for information on a topic and find a post on your own site that was added three years ago. That’s what happened to me with the TLS topic for The Onion. You’ll never guess what the post was called… yes, that’s right, the title was “TLS certificate for onion site” and I found it by typing “onion cert harica” into Google, where the result with my site was somewhere in the middle of the first page of Google.
Some time ago I got into the habit of looking at my site first and possibly updating the post before I started writing a new one, but I forget that sometimes xD. So let this post be a lesson to me and assume that the topic is so important and interesting that I will repeat it. This time with an example of how I implemented it on my site.
If you are also considering implementing onion cert on your website, make sure you configure hidden services correctly first, for example by reading “Add Onion domain to your website“. And here are details about Harica onion cert itself. It costs only 30 USD per year and if you buy it for a longer time you will get some discount.
Some people might ask, but why? Why a cert for an already encrypted connection? Good answers have already been provided, just check out HTTPS for your Onion Service and HARICA announcement on Kiwifarms.
Okay no more repeating the same information over and over again. It’s time to show you how I configured it.
Setup
First of all you need to register an account in Harica Cert Manager, buy a cert for a server and follow the instructions to verify your domain. As I am using Hexo Generator and I choose the option to verify by file, I had to create a specific folder on the server. In Hexo you can generate additional folders and content just by adding them to the source folder in Hexo and then include the folder in Hexo configuration file _config.yml, here is my example: include: .well-known/**/*. Thanks to this modification, the folder will be moved to the root folder of your site during website generation.
Once the domain has been confirmed by Harica and the certificate has been paid, you can configure your web server. My Nginx configuration has two site files, one for the standard domain 0ut3r.space and the other for onion domain. Both look pretty much the same, the only difference is the port number.
For the onion configuration I just had to add cert and force browsers to use https connection instead of http. Here is what I added in the server section.
1 | listen 127.0.0.1:8080; |
Added another lines for ssl:
1 | #SSL |
As Harica allows you to download cert in different formats, just make sure that you downloaded PEM bundle (typical text format including the whole certificate chain together with the cross certificate). Your private cert will probably be encrypted with a password (you can generate and import your private key or generate one in Harica Cert Manager), but you don’t want to type it every time you restart your web server, so remove the password from it using the command:
1 | openssl rsa -in your_private_key.pem -out new_private_key.pem |
After running this command, you’ll be prompted to enter the password for the current private key. Once you enter the correct password, OpenSSL will generate a new private key file (new_private_key.pem) without a password.
Don’t forget to change your Tor configuration in /etc/tor/torrc accordingly:
1 | HiddenServiceDir /var/lib/tor/yourwebsite/ |
And make sure your firewall is not blocking those ports :D
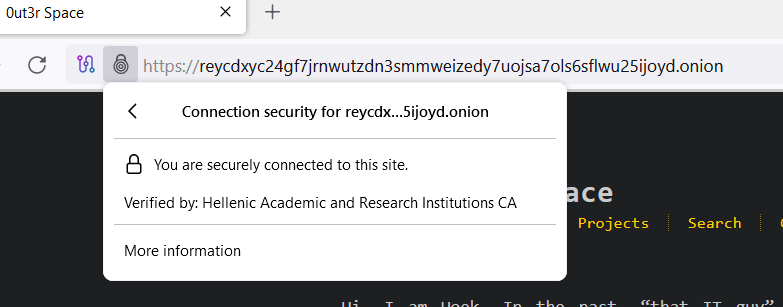
That’s it. I am happy that I finally implemented TLS for my onion domain, which I wanted to do for a long time (but forgot), and that my visitors feel safer now. Because you feel safer now, right? At least you can always check that the Onion site you are on matches the certificate, so you know you are on the one you want to be on and not one of the clones. As TBH, I bought and configured it just for my own weird amusement.