GNU Privacy Guard (GnuPG or GPG) is a complete and free implementation of the OpenPGP (also known as PGP)
GnuPG allows you to encrypt and sign your data and communications; it features a versatile key management system, along with access modules for all kinds of public key directories. GnuPG, also known as GPG, is a command line tool with features for easy integration with other applications. A wealth of frontend applications and libraries are available. GnuPG also provides support for S/MIME and Secure Shell (ssh).
Thanks to the knowledge of GPG, you have the option of sending encrypted messages via any e-mail or service that allows communication in such a way that nobody but the recipient can read the message on the way. Cool right?
Sometimes users are afraid of complicated commands. If someone has concerns about the use of several commands, then can use the graphical frontends available for almost every operating system.
Each user must have two keys, public and private to be able to encrypt and decrypt messages.
The easiest way to understand the process is to look at the picture below
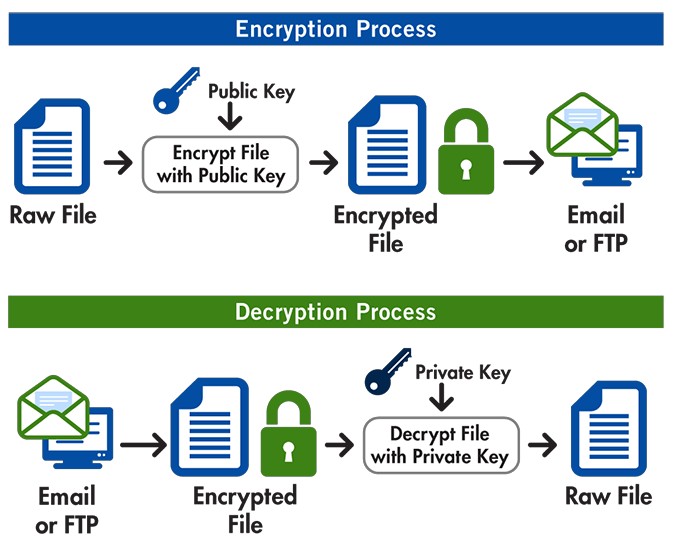
image source: Open PGP
So you have to create your private and public key and then learn how to share your public key, decrypt and encrypt messages. Additionally, it is also worth knowing how to sign the messages and check the signatures of others. At the beginning it seems complicated, as soon as you get it you’ll see how simple it is.
GPG Commands
Examples for Linux. Don’t forget to download version for your operating system. Commands are the same for any OS. This is just a quick guide with basics. Full documentation can be found here.
Generate a GPG key pair
Just run a command:
1 | gpg --full-generate-key |
and follow instructions on the screen.
Specify the kind of key you want, or press Enter to accept the default RSA and RSA.
Enter the desired key size. Recommend the maximum key size of 4096.
Enter the length of time the key should be valid. Continue without any date then key doesn’t expire.
Verify that your selections are correct.
Enter your user ID information.
Type a secure passphrase. You will use this password to encrypt and decrypt messages.
Sometimes during generating, import or export you can have some errors so best solutions is to restart gpg agent
1 | gpgconf --kill gpg-agent |
List secret keys
List GPG keys for which you have both a public and private key.
1 | gpg --list-secret-keys --keyid-format |
Example of output:
1 | ------------------------------------ |
From the list of GPG keys, copy the GPG key UID you’d like to use. In this example, the GPG key UID is 3BB5C34231531BA2.
Export public key
The public key is the key that you share with others so that they can encrypt the message for you. You can view and copy or export it in several ways. Try each option and compare the results to understand how each option works.
Print the GPG key UID, in ASCII armor format.
1 | gpg --armor --export 3BB5C34231531BA2 |
Copy your GPG key, beginning with -----BEGIN PGP PUBLIC KEY BLOCK----- and ending with -----END PGP PUBLIC KEY BLOCK----- and share with others.
You can also export your public key to file (binary file).
1 | gpg --export 3BB5C34231531BA2 > /tmp/my-public-key |
or to a file as text
1 | gpg --armour --export 3BB5C34231531BA2 > /tmp/my-public-key-text |
You can also use email address or user name instead of UID.
1 | gpg --export [email protected] > /tmp/my-public-key |
1 | gpg --export user > /tmp/my-public-key |
Export secret key
It is worth taking a copy of the private key and storing it, eg on an encrypted disk. Export is useful for transferring the key to another device. Never share your private key with anyone.
Export to binary file:
1 | gpg --export-secret-key --armour > /tmp/my-private-key |
Export to text file:
1 | gpg --export-secret-key > /tmp/my-private-key-text |
Import keys
Easy like this:
1 | gpg --import my-private-key |
1 | gpg --import any-public-key |
If the key already existed, the import will fail saying ‘Key already known’. You will have to delete both the private and public key first.
Delete keys
To delete the public key
1 | gpg --delete-keys [email protected] |
To delete the private key
1 | gpg --delete-secret-keys [email protected] |
Sending to key server
Example of sending key to public key directory.
1 | gpg --keyserver "hkp://keyserver.ubuntu.com" --send-key 3BB5C34231531BA2 |
Retrieving the key from the server
1 | gpg --keyserver "hkp://keyserver.ubuntu.com" --recv-keys 3BB5C34231531BA2 |
Fingerprints
If you want to see “Fingerprints” to ensure that somebody is really the person they claim (like in a telephone call). This command will result in a list of relatively small numbers.
1 | gpg --fingerprint |
After import key verify it by displaying fingerprint and contact with owner to compare fingerprint.
Revoke a key
For several reasons you may want to revoke an existing key. For instance: the secret key has been stolen.
Create revoke certificate:
1 | gpg --gen-revoke [email protected] |
It will look like this:
1 | -----BEGIN PGP PUBLIC KEY BLOCK----- |
If you import it like a normal key then it revoke the one for which it was generated.
1 | gpg --import /tmp/revoke_cert |
Key signing
Signing a key means expressing that you have checked that the user really belongs to that key. You should only sign a key as being authentic when you are ABSOLUTELY SURE that the key is really authentic!!!
1 | gpg --edit-key [email protected] |
we will enter the interactive mode, then write
1 | sign |
Based on the available signatures and “ownertrusts” GnuPG determines the validity of keys. Ownertrust is a value that the owner of a key uses to determine the level of trust for a certain key. The values are:
1 | 1 = Don't know |
You can check results:
1 | check |
save changes and quit:
1 | quit |
We set the trust for the key on its own and it is personal information. This means that it is not exported with the key. It is even stored in a separate file.
Key trust
Trusting a key means that you will accept signatures from it.
Determining key trust:
1 | gpg --edit-key [email protected] |
in interactive mode write:
1 | trust |
Values:
1 | 1 = I don't know or won't say |
save changes and quit:
1 | quit |
Encrypt
Encryption of a text file (binary)
1 | gpg -r recipent --encrypt /tmp/message.txt --output /tmp/message.gpg |
Where recipent is the name of someone’s public key. Check your public key list gpg --list-keys. To see the signatures as well type gpg --list-sigs. This file is ready to send to your recipient.
To make it possible to copy the content, for example, to send it by e-mail
1 | gpg -r recipent --encrypt /tmp/message.txt --armour --output /tmp/message.gpg |
now you can open the file or display its contents in the console
1 | cat /tmp/message.gpg |
Copy your encrypted message, beginning with -----BEGIN PGP MESSAGE----- and ending with -----END PGP MESSAGE----- and send by email or communicator.
You can also just paste text into the console and get encrypted output to copy.
1 | echo "This is a secret message" | gpg --encrypt --armor -r [email protected] |
Decrypt
Decrypting the message:
1 | gpg --decrypt /tmp/message.gpg |
You will be asked for the password for your private key and you will see the decrypted message when you enter it.
Descyrpt just pasted text:
1 | echo "Decrypted Message Text" | gpg --decrypt |
Sign and verify
Signing a message:
1 | gpg --sign /tmp/message.txt --armour --output /tmp/message.sig |
veryfing the signature:
1 | gpg --verify /tmp/message.sig |
and veryfing and decrypting with help
1 | gpg --decrypt /tmp/message.sig |
to sign in a text form for people without gpg
1 | gpg --clearsign /tmp/message.txt --output /tmp/message.sig |
signing without modification of the text file with the signature in a separate file
1 | gpg --detach-sig /tmp/message.txt --output /tmp/message.sig |
then you verify with two files
1 | gpg --verify /tmp/message.sig /tmp/message.txt |
Encryption without a key
You can use symmetric encryption to encrypt a file without having a key with a one-time password.
1 | gpg --symmetric /tmp/message.txt --armour --output /tmp/message-sym.gpg |
Then provide the password with a separate secure channel other than the message itself.
Frontends and other software
There are several graphical interfaces for the GPG. Here are some examples.
- Windows - Gpg4win
- MacOS - GPG Suite
- Android - OpenKeychain
- Linux - Seahorse as key manager and Geany editor with GeanyPG plugin.
Full list of frontends and software support GPG can be found here.
Active key servers
There is a lot of dead links to key servers, where you can share you public key. The issues with PGP keyservers were more broadly related to the fact that they allowed anyone to upload PGP keys to the server without necessarily verifying the identity of the key owner. This led to various concerns, such as the potential for spam, misuse, and the inclusion of fake or malicious keys.
In 2019, a research paper titled “Key Reinstallation Attacks: Forcing Nonce Reuse in WPA2“ also highlighted vulnerabilities in the OpenPGP and S/MIME email encryption protocols. As a result, some keyservers took actions to mitigate potential risks. For instance, some keyservers disabled certain features or deprecated specific keyserver pools.
Additionally, there were incidents where individuals’ personal information, including email addresses, were exposed on keyservers, raising privacy issues. As a response to these concerns, some keyserver operators decided to shut down or limit their services.
Here are the servers that remain operational and active:
hkp://pgp.mit.edu
hkp://keyserver.ubuntu.com
hkp://keyring.debian.org