I decided to use the Let’s Encrypt offer and configure the free certificate for my website. From today you are browsing my website in a safe way.
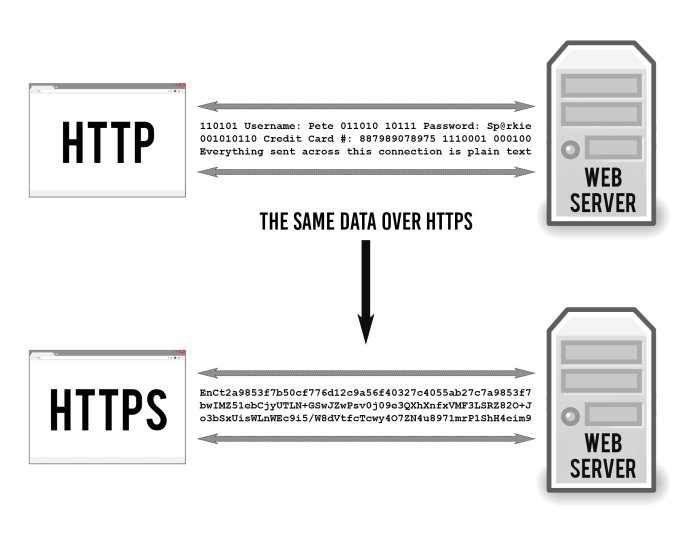
HTTPS keeps stuff secret by encrypting it as it moves between your browser and the website’s server. This ensures that anyone listening in on the conversation can’t read anything. This could include your ISP, a hacker, snooping governments, or anyone else who manages to position themselves between you and the web server.
I encourage everyone to implement this solution on their websites. In addition, using https has a good effect on website positioning. Google is more likely to promote websites that encrypt traffic than those without encryption.
Below I will present the steps I have made to configure my web server (Nginx) on Debian to use HTTPS.
Here are other solutions for other web servers and systems.
SSL Cert for Nginx on Debian
Pre-settings
Edit source list
1 | sudo nano /etc/apt/source.list |
Add backports (in my case it is Debian 9)
1 | deb http://ftp.debian.org/debian stretch-backports main |
Update packages list
1 | sudo apt-get update |
Install Certbot for Nginx
1 | sudo apt-get install python-certbot-nginx -t stretch-backports |
Firewall rules
I am using UFW. These are commands to allow traffic on spcific ports.
1 | sudo ufw allow 443/tcp |
For IP Tables:
1 | iptables -A INPUT -p tcp -m tcp --dport 80 -j ACCEPT |
Nginx
In Nginx configuration you need to check if server_name is set.
1 | sudo nano /etc/nginx/sites-available/default |
Add domain name to server block
1 | server_name example.com www.example.com; |
Check Nginx config
1 | sudo nginx -t |
If everything is ok, restart Nginx.
1 | sudo service nginx restart |
or
1 | sudo systemctl restart nginx |
Get an SSL Certificate
If this is your first time running certbot, you will be prompted to enter an email address and agree to the terms of service.
1 | sudo certbot --authenticator standalone --installer nginx -d example.com -d www.example.com --pre-hook "systemctl stop nginx" --post-hook "systemctl start nginx" |
Provide your email and accept terms. Your cert will be generated.
If successful, you will be able to choose between enabling both http and https access or forcing all requests to redirect to https.
1 | Please choose whether or not to redirect HTTP traffic to HTTPS, removing HTTP access. |
I suggest to choose option 2. Certbot will add automatically additional lines to your website config. Once complete you will get message:
1 | ------------------------------------------------------------------------------- |
Auto Renewal
As Let’s Encrypt certs expire after 90 days, they need to be checked for renewal periodically. Certbot will automatically run twice a day and renew any certificate that is within thirty days of expiration.
To test that this renewal process is working correctly, you can run:
1 | sudo certbot renew --dry-run |
Backup
Don’t forget to backup your keys. They are located here:
1 | /etc/letsencrypt/archive/ |
Alternative method
Everywhere where the above method doesn’t work you can try official, alternative method. It’s perfect for Debian 8 (Jessie).
Uninstall certbot (if installed):
1 | sudo apt-get remove certbot |
Download certbot-auto:
1 | wget https://dl.eff.org/certbot-auto |
Allow execute:
1 | chmod a+x certbot-auto |
certbot-auto accepts the same flags as certbot; it installs all of its own dependencies and updates the client code automatically.
Certbot has an Nginx plugin, which is supported on many platforms, and automates certificate installation.
1 | sudo /path/to/certbot-auto --nginx |
Running this command will get a certificate for you and have Certbot edit your Nginx configuration automatically to serve it. If you’re feeling more conservative and would like to make the changes to your Nginx configuration by hand, you can use the certonly subcommand:
1 | sudo /path/to/certbot-auto --nginx certonly |
Check if automating renewal works good:
1 | sudo /path/to/certbot-auto renew --dry-run |
Add cron task to autorenew cert:
1 | 0 0 * * 1 /path/to/certbot-auto renew --quiet --pre-hook "service nginx stop" --post-hook "service nginx start" |
This will run renew at 00:00 on Monday every week with flag to silence all output except errors and another flag to restart Nginx service.
Online generators
On Mozilla SSL Configuration Generator and CAA Record Helper by SSLMate website you can create configuration files automatically.